Your InSitu projects are technically perfect: dimensions are right, catalogs are up to date, the layout is approved. Yet when you send your export to RenderThink, the photorealistic render doesn't always have the finesse you expected. Harsh shadows, a perspective that flattens the room, low resolution: a few settings adjusted upstream will radically change the result.
This guide gathers the five essential parameters to configure in InSitu before sending your scene to RenderThink. They guarantee a neutral base, faithful to your design intent, that AI can then enhance without having to compensate for defects in the source scene.
Please note: the numeric values given in this guide are provided as a guideline only. Every scene is unique (room size, number of openings, dominant materials) and you will often need to adjust them slightly to achieve a truly neutral render. Consider them as a reliable starting point, to be fine-tuned on a case-by-case basis for your project.
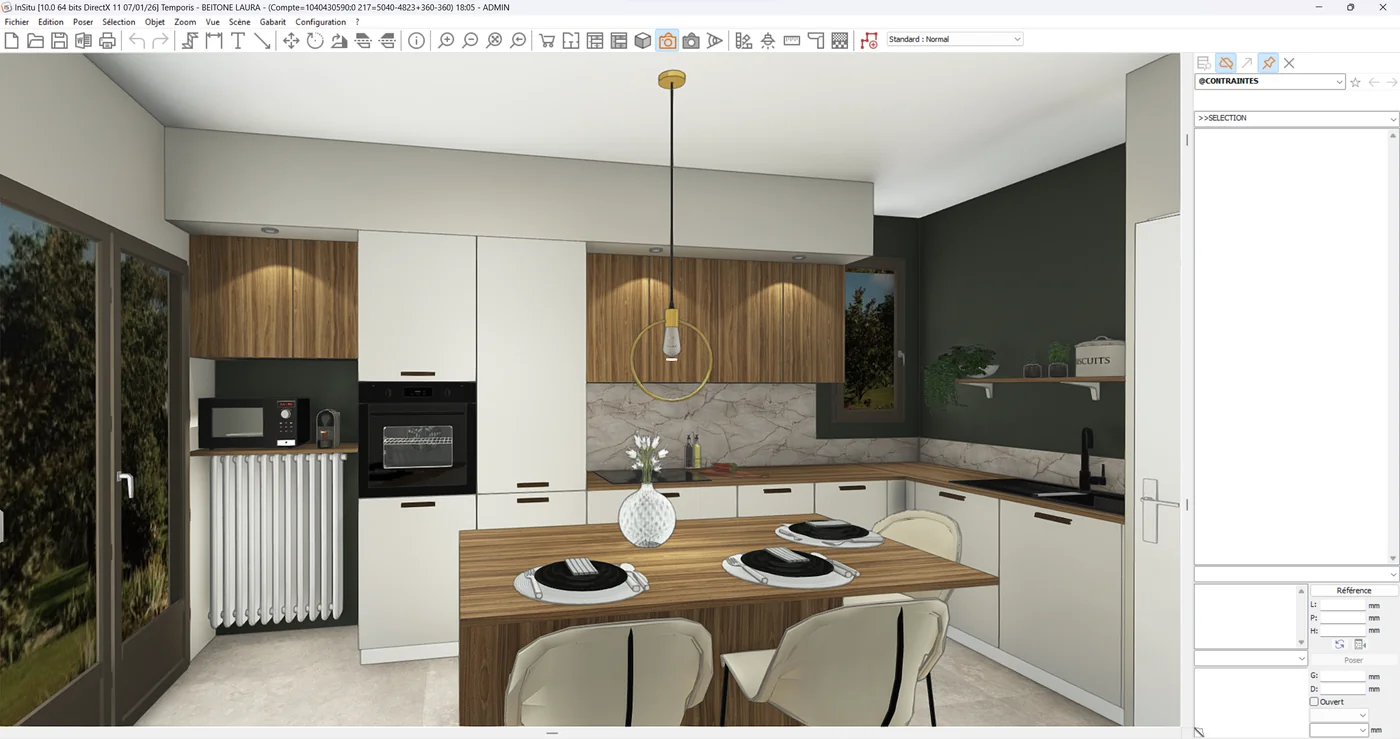
1. Set natural light to the minimum
First reflex: flatten the light before exporting
Before touching a single parameter, keep this principle in mind: your export is not a final image, it's a working image. It doesn't have to be beautiful, it has to be readable.
A scene that is well lit for the human eye is often badly lit for a photorealistic engine. InSitu's default spotlights create hot spots on countertops, strong reflections on lacquered fronts and, in return, dense shadows under wall units and in corners. Yet in a burnt-out area, just like in a crushed shadow, the information is gone: no more material, no more edge, no more texture. AI cannot restore what it cannot see. It will fill in the gaps, and that's where light blurs, bleeding contours and materials that change appearance from one end of the unit to the other come from.
The goal is therefore the opposite of what intuition suggests: flatten the light as much as possible, get uniform lighting with no dominant cast and no marked gap between bright and dark areas. Lighting design, reflections and depth are the engine's job afterwards. Your job is to hand it clean geometry and perfectly readable materials.
The settings in InSitu
Open the Scene lighting dialog, then the Natural light tab. Target values:
- Intensity: around 19%
- Sunny weather: around 18%
- Indoor scene: checked, even for a kitchen or a bathroom. This setting homogenizes diffusion and avoids abrupt light falloff in the corners of the room.
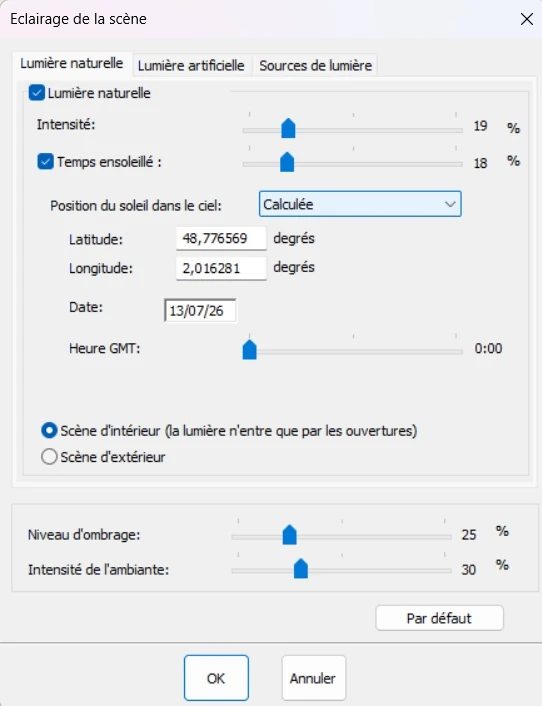
These values are a reliable starting point for the vast majority of scenes. Adjust them by a point or two depending on how bright your finishes are: white or highly reflective fronts take less intensity, a project in dark tones needs slightly more.
The check before exporting
Look at your scene and ask yourself two questions:
- Is there any pure white? A countertop or a wall that "disappears" into the light signals a burnt-out area. Lower it further.
- Is there any crushed black? Under wall units, in a niche, behind an island: if you can no longer make out the background, AI won't make it out either.
A good export will probably look a bit dull, a bit flat to you. That's exactly what we're after: this image without relief holds more usable information than a contrasted, flattering render, and it's the one that will give the sharpest final result.
2. Reduce artificial light to essentials
Same logic for artificial light. By default, InSitu adds automatic ambient lighting that tends to flatten volumes. For a quality AI render, you need to tone it down.
In the Scene lighting dialog, Artificial light tab, start by unchecking the "Artificial light (automatic)" box, then apply these settings:
- Type: Lamp
- Layout: Automatic
- Power: 30%
- Shading level: 25%
- Ambient intensity: 30%
The last two settings sit at the bottom of the dialog: they are shared by both tabs and therefore also apply to natural light.
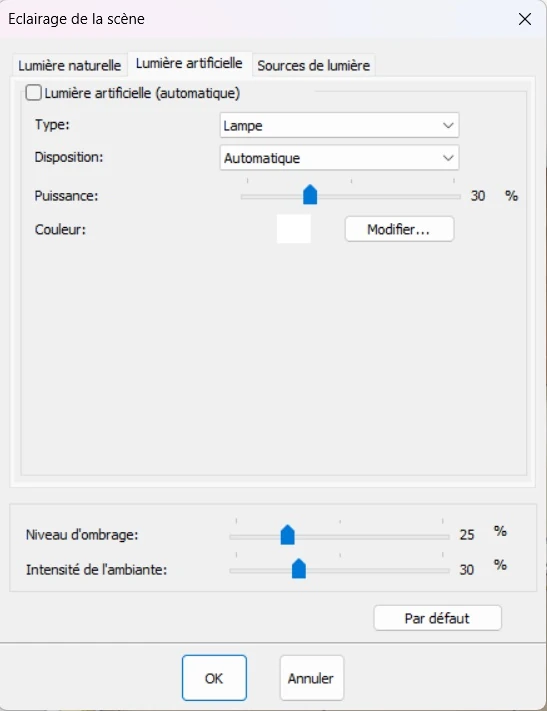
With these values, you keep just enough lighting so materials, textures and cast shadows remain readable. The AI engine then gets a balanced, non-overexposed scene on which it can apply convincing photorealistic lighting.
3. Set the camera to a slight downward angle
Camera angle is the most often neglected parameter, yet it's the one that immediately signals a professional render. A camera too low crushes the room, a camera too high gives the impression of a scale model. The right position is a slight downward tilt, as if an interior photographer were holding their camera at the eye level of a standing adult.
In InSitu, open the Observation window (camera / viewpoint tool) and enter:
- Height: between 1,450 and 1,500 mm
- Angle: -1° (slight downward tilt)
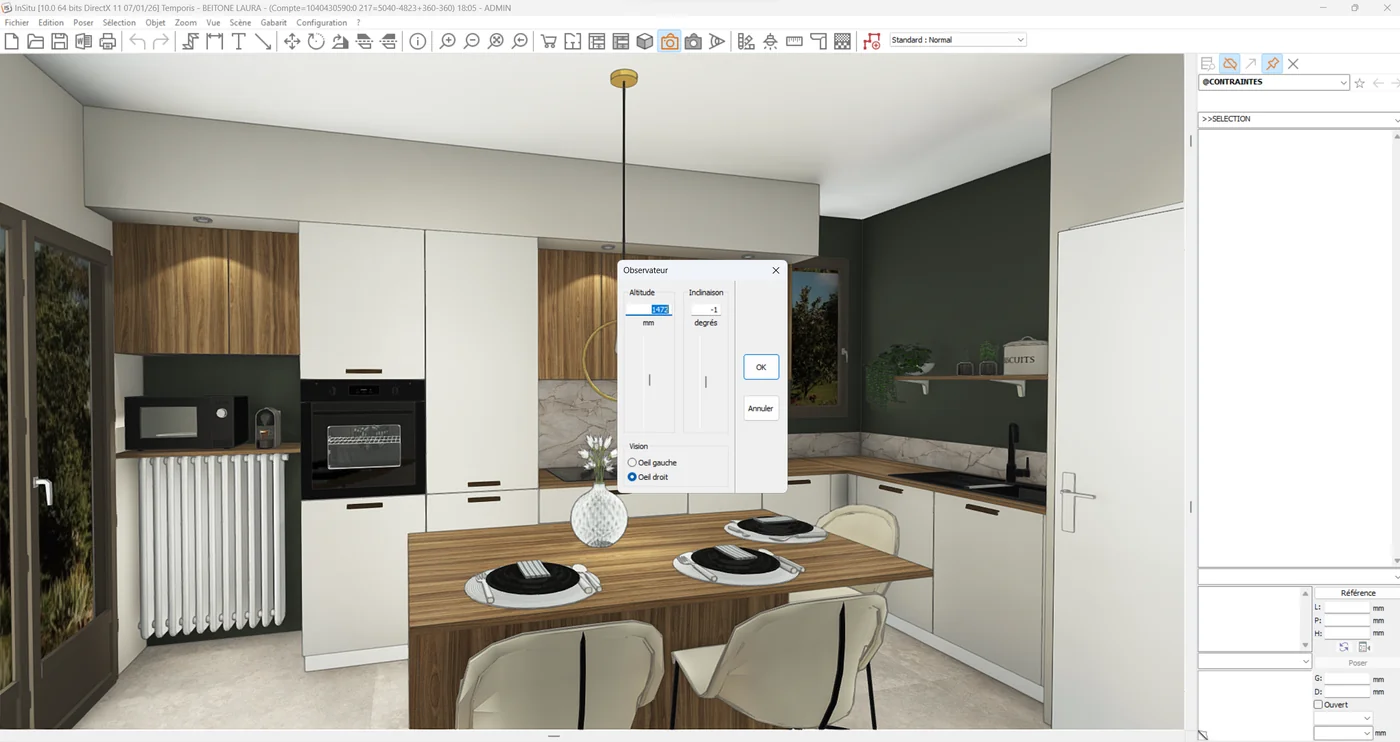
These values reproduce the gaze of a client entering the room. The result is immediately more immersive, furniture appears correctly, and proportions respect real human perception. The same principle we detail in our article on photorealistic renders from Winner and InSitu.
4. Use the semi-realistic view, not InSitu photorealism
Counter-intuitive at first glance: even though your final goal is a photorealistic render, you should avoid InSitu's internal photorealism mode at export time. This mode applies heavy post-processing effects (lens flare, bloom, tonemapping) that blur the AI's analysis of the scene.
Prefer the semi-realistic view: it preserves the exact materials and colors of your project, with a clean render and no added artistic effects. RenderThink then applies photorealism with an AI engine built specifically for that.
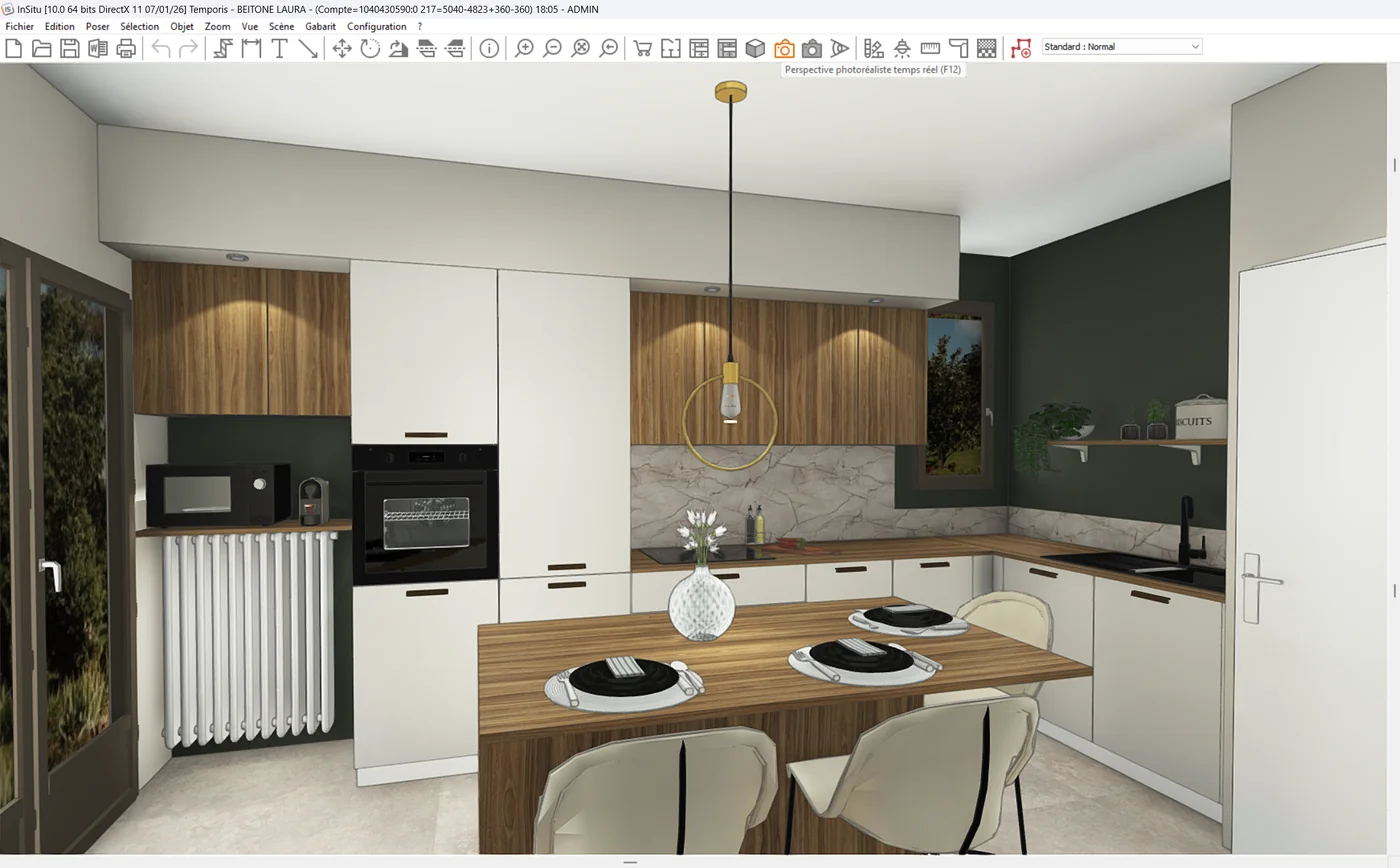
This rule aligns with the general principles we share in our guide to 7 tips to optimize your SketchUp, Winner and InSitu exports: a neutral source image is always better than an overloaded one.
5. Export in 4K (3840 × 2160)
Final parameter, and not the least: export resolution. Sending a 1,280 × 720 image to an AI engine means asking it to invent too many details. Sending a 4K image provides all the information needed to produce a sharp, detailed render, ready to be printed or displayed on a large showroom screen.
In the Image resolution window, choose:
- Format: 4K
- Dimensions: 3,840 × 2,160 pixels
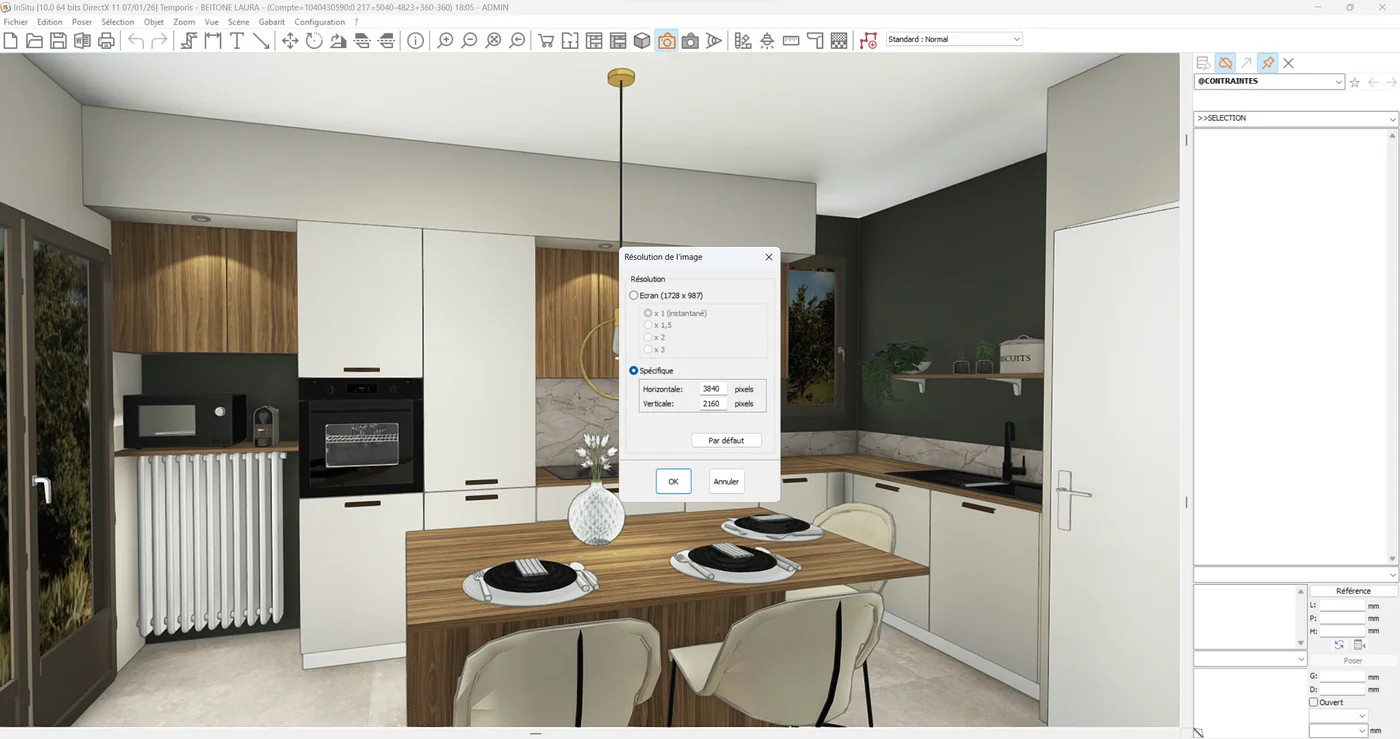
The file will be heavier, but the quality gain is immediate: finer textures, more precise contours, perfectly readable hardware details. That's the difference between an "acceptable" render and one that convinces a client on a €15,000 project.
Recap: the checklist before every InSitu export
Before launching your export to RenderThink, quickly verify these five points:
- Natural light: intensity 19%, sunny weather 18%, indoor scene
- Artificial light: power 30%, shading 25%, ambient 30%
- Camera: height 1,450-1,500 mm, angle -1°
- View mode: semi-realistic view (not InSitu photorealism)
- Resolution: 4K, meaning 3,840 × 2,160 pixels
These five settings take less than a minute to apply once you know them. And they radically transform the quality of the AI renders you'll get. You go from decent images to visuals that close deals in the showroom.
From InSitu export to client signature
Once your image is exported with the right settings, all you need is to send it to RenderThink. In under two minutes, AI transforms your semi-realistic view into a photorealistic image faithful to your project. You can then modify cabinet fronts, countertops and backsplashes directly on the render to offer variants without touching your InSitu scene.
And for the final presentation, assemble your best images into a showroom presentation shareable via secure link. Your client browses it on their phone that evening, shares it with their partner, and comes back to sign the next day.
Try RenderThink free for 14 days: apply these five settings to your next InSitu project, launch your first render, and compare. The difference is immediate, no training needed and no software change.